
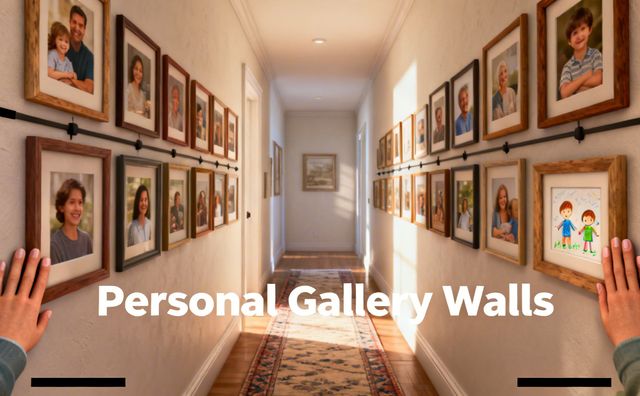
Personal Gallery Walls: Telling Your Story Through Art and Photography
Curate a dynamic display that celebrates your family’s history and milestones.
Why Personal Gallery Walls Matter
When I create a gallery wall in my home, I feel like I am turning our everyday
memories into beautiful decor that quietly tells our family story to anyone who
walks in, including my children. Instead of hiding photos in boxes or on a
phone, I bring them out and let them live on the walls, where we can see God’s
blessings in our lives every single day. A gallery wall can hold the big moments
like weddings and births, but also the small ones like muddy boots after a hike
or a quiet morning at the breakfast table. Over time the wall becomes a visual
diary, and it helps my kids see that ordinary faithfulness and family time are
worth celebrating just as much as the big events. In a world that moves fast, a
gallery wall gently slows us down and reminds us of who we are as a family and
what we value inside these walls.
To me, a gallery wall is not just about hanging pretty art; it is about showing
what matters most in our home and what kind of life we are building together.
When guests come over, they can see our values without me saying a word, whether
that is a framed Bible verse, a photo from a missions trip, or a picture of our
family around the dinner table. Milestones like graduations, first steps, and
anniversaries remind us of God’s faithfulness over the years and help our
children see where they came from. When I curate the wall carefully, it feels
like a testimony that family, commitment, beauty, and shared memories are worthy
of space and attention. This kind of visual storytelling can shape the
atmosphere of the whole home and make it clear that what happens in the family
is more important than trends outside the front door.
Before I became a stay-at-home mom, I worked as a fashion and event
photographer, and that taught me how powerful a single image can be in shaping
the mood of a space. I learned how light, color, and composition pull your eyes
in a certain direction and how a well-chosen photo can make a room feel
peaceful, joyful, or dramatic. When I build a gallery wall now, I use that same
eye to decide which moments deserve the spotlight and which should play a
supporting role. A bright, laughing family photo might become the heart of the
wall, while softer detail shots fill in the gaps with texture and warmth. The
way I place these images can change how a room feels, whether it is a cozy
family room or a calm master bedroom, and that is the beauty of using
photography as part of your home story.
A house with empty, bare walls often feels cold and temporary to me, but once
you add a gallery wall of meaningful pieces, it suddenly feels lived-in and full
of life. As a woman who cares deeply that my home reflects our family life, I
want people to know this is not just a showplace; it is where we laugh, pray,
raise our kids, and share meals. Gallery walls help with that, because they
bring warmth and connection into otherwise blank spaces like hallways or
stairwells. When my children see their drawings and photos on the wall, they
feel seen and valued, and that adds to the sense of belonging in our home.
Instead of chasing perfect decor that looks like a hotel, I prefer walls that
show real family stories, even if that means a few mismatched frames and silly
kid smiles.
There are real social and emotional benefits when we see familiar faces and
meaningful images every day in our home. My kids often stop in front of our
gallery wall and point out pictures, asking to hear the stories again about when
they were babies or when we took a special trip together, and those little
conversations build closeness. For me, on hard days, catching a glimpse of my
wedding photo or a picture of all of us laughing reminds me of God’s goodness
and helps calm my heart. Guests also respond warmly to personal walls, and they
become natural conversation starters that connect people more quickly. In a
busy, distracted world, a gallery wall can act like a gentle anchor that brings
focus back to family, faith, and shared memories, which brings a quiet sense of
peace into the home.
Planning Your Story: Themes, Timeline, and Purpose
Before I hang a single frame, I like to pause and decide what story I want this
particular gallery wall to tell, because that choice guides every other
decision. Sometimes I focus on family milestones like weddings, baby
dedications, graduations, and first days of school, which creates a strong sense
of history. Other times I choose travel memories so we can remember the places
God has allowed us to see together, or I build a seasonal theme with cozy fall
photos and Scripture prints about gratitude. A mixed-moments wall can also be
lovely, with a blend of everyday life, special celebrations, and a few favorite
quotes. Knowing your main story helps you say no to random pieces that do not
fit and keeps the wall from feeling like a jumble of images with no clear
message.
Once I know the story, I choose between a timeline approach and a theme-based
approach, because that changes how the eye reads the wall. A chronological
layout works well for hallways or staircases, where you can literally walk
through time as you move past the frames, starting with early marriage or baby
years and moving toward the present. A theme-based wall can be organized around
color, subject, or mood, such as black-and-white portraits, warm-toned travel
photos, or all nature scenes that bring a calm feeling into the space. Sometimes
I combine both ideas by grouping small chronological clusters within a
color-coordinated theme. The key is to be intentional so the layout feels
natural and easy to follow, rather than random or chaotic.
I also ask myself why this wall exists at all, because its purpose will shape
how bold or quiet it should be. If the main goal is daily joy for our family, I
might choose more playful, candid shots that make us smile every time we pass
by. If it is meant to be a conversation piece for guests in the living room or
dining room, I might include striking images or unusual keepsakes that invite
questions and stories. For a tribute space, like a wall that honors grandparents
or a loved one who has passed away, I keep the tone more respectful and calm,
with softer colors and maybe a favorite Bible verse. When the purpose is clear,
it becomes easier to decide on frame sizes, colors, and how much visual drama
you want in the arrangement.
Because I am a very visual person, I like to sketch a simple plan on paper
before I commit to nails in the wall, and my background as a photographer really
helps with that. I draw a rough rectangle for the wall space and then block in
frame shapes, deciding where the main focal piece should go and how the smaller
items will balance around it. I think about negative space, which is just the
empty wall between frames, because that breathing room keeps everything from
feeling cluttered. This little planning step saves a lot of frustration later
and keeps me from putting too many pieces in one area. Even if you are not an
artist, a quick pencil sketch can help you see the big picture and feel more
confident before you start hanging anything.
Choosing Photos, Artwork, and Keepsakes
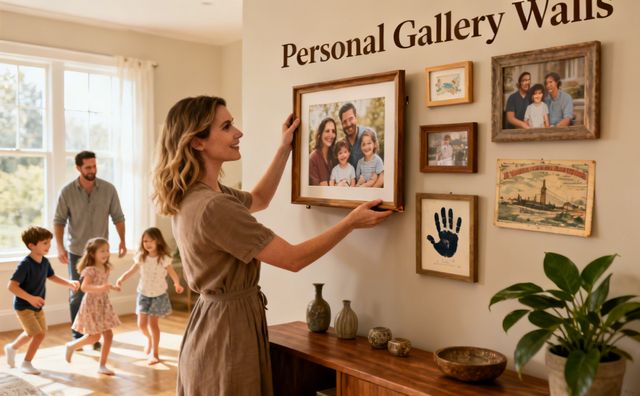
Every strong gallery wall needs an anchor, so I always start by choosing one
powerful focal photo that will set the tone for the entire arrangement. This
might be a recent family portrait, a favorite wedding image, or a candid shot
that captures your family’s personality in a real and joyful way. I usually
print this focal image larger than the others so it naturally catches the eye
first, and I give it a frame that fits the room’s style. Once that main piece is
chosen, the rest of the wall becomes about supporting and echoing the feeling of
that image. Placing the anchor slightly above eye level in a living room or
closer to eye level in a hallway helps guide the viewer’s gaze exactly where I
want it to land.
To keep the wall lively and interesting, I like to mix frame and image sizes,
using one large piece, several medium frames, and a few smaller items to keep
the eye moving. If everything is the same size, the wall can feel flat and a bit
boring, almost like a grid of yearbook photos. By varying the sizes, I create a
natural rhythm where the eye jumps from big to small and back again, discovering
new details along the way. I usually cluster smaller frames near the larger
ones, so they look like a family of images instead of lonely little dots on the
wall. This mix of scale, done with intention, adds a designer touch without
needing expensive art or complicated tools.
A gallery wall feels most personal when it is not just photographs, so I like to
include artwork from my children or pieces from local artists we want to
support. My kids are always proud when their drawings or watercolor paintings
get a “real frame” and a place on the wall, and it shows them that their
creativity matters. Local art can also add a sense of place, whether that is a
painting of a landmark in your town or a simple botanical print from a
neighborhood market. These pieces bring in different textures and styles, which
breaks up long rows of photos and adds depth. When I blend photos with art, the
wall looks curated and soulful instead of overly themed or staged.
I try to avoid using too many images that look almost the same, because that can
make a wall feel repetitive and dull. Instead, I vary the color, mood, and
subject so there is always something fresh for the eye to find. For example, I
might combine one formal posed family shot with a close-up of little hands
holding a flower and a wide landscape from a family hike. I also mix brighter,
joyful images with calmer, softer ones, so the wall has emotional balance and
does not feel too chaotic. Being selective is important; it is better to choose
a few strong, different images than to cram in every single snapshot from your
phone.
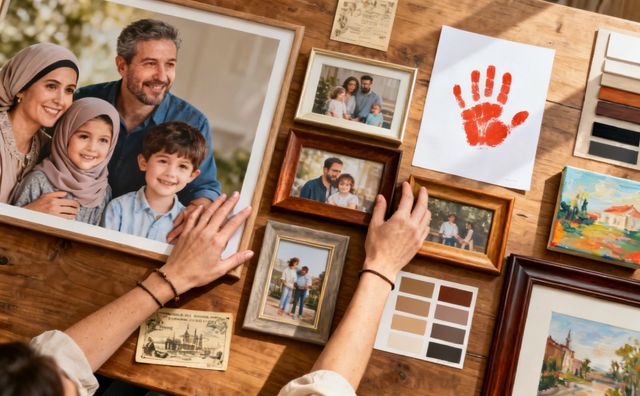
Beyond traditional framed photos, I love including other print styles and small
keepsakes to add richness and a sense of history. Mixing in a canvas print, a
postcard from a special trip, or a tiny framed wedding invitation changes the
texture of the wall and makes it more engaging. I sometimes frame pressed
flowers from a bridal bouquet or a ticket stub from a concert my husband and I
attended early in our marriage, and those simple items always spark stories.
These touches remind me that life is not just made up of posed pictures; it is
built from real moments, tiny details, and ordinary objects that carry deep
meaning. When everything works together, the wall becomes a layered tapestry of
your family’s journey, not just a row of smiling faces.
Layout, Balance, and Flow
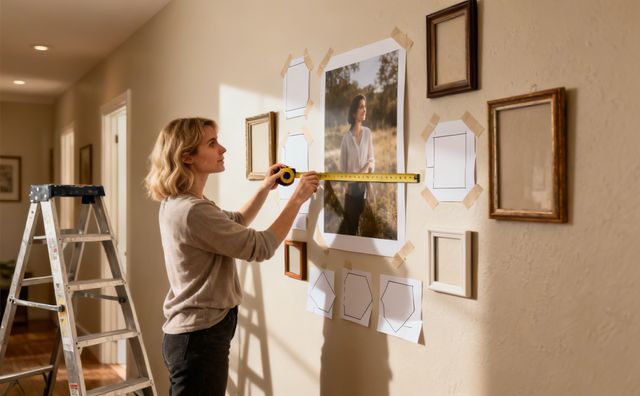
When I am ready to test a layout on the actual wall, I like to make paper
templates of each frame and tape them up before I hammer a single nail. I trace
around the frames onto brown paper or even old wrapping paper, cut out the
shapes, and mark where the hanging hardware sits on the back. Then I move the
paper pieces around on the wall until I am happy with the spacing and balance,
which is much easier to adjust with tape than with holes. This simple step saves
the wall from looking like a pin cushion and gives me permission to play and
experiment. My kids sometimes join in and help place the templates, which turns
it into a fun family project rather than a stressful decorating chore.
As I arrange the pieces, I usually aim for a visual triangle or a clear central
anchor with supporting pieces grouped around it, because that structure is very
pleasing to the eye. A visual triangle means that your three strongest elements
form a loose triangle shape, which naturally guides the viewer’s gaze around the
wall instead of letting it get stuck in one corner. When I use a central anchor
approach, I put the largest or most important piece near the middle and then
build outward, adding other frames in a way that feels balanced on both sides. I
watch for heavy spots where there are too many large dark frames together and
try to spread them out so the wall does not feel lopsided. This kind of
thoughtful arrangement can turn even simple photos into a display that looks
intentional and graceful.
I also make sure to mix horizontal and vertical frames, because using only one
direction can make the wall look stiff and lifeless. A blend of landscape and
portrait orientations creates a gentle sense of movement and keeps the layout
from feeling like a grid on a computer screen. I like to alternate them so that
a vertical frame might sit next to or above a horizontal one, creating small
groupings that interlock. This mix allows me to use a wider variety of photos,
since not every favorite image fits the same crop. In the end the wall feels
more natural and relaxed, like a conversation, instead of overly rigid or
formal.
Frames, Mats, and Materials: Choosing the Right Look
The frames you choose can completely change the feeling of your gallery wall, so
I try to match them with the overall style of my home. In a rustic or farmhouse
space, light or medium wood frames feel warm and natural, especially when paired
with simple white mats. For a modern or minimal home, black or very dark frames
add clean lines and a strong outline around each piece. If your taste is more
eclectic, mixing metals like brushed gold, bronze, and black can look charming
and collected over time. The goal is to have the frames support the story you
are telling, not fight against it.
Mats are one of my favorite tools because they give photos some breathing room
and can make even a small print feel important and polished. When you place a
photo inside a mat, the eye is drawn inward, and the image does not have to
compete as much with the frame or the wall color. I often choose off-white or
cream mats instead of bright white, because they feel warmer and more forgiving
in most rooms. Mats are especially helpful for kid art or old family snapshots
that might be an odd size, since you can center them and still use a standard
frame. They add that extra layer of calm and order that keeps a busy wall from
feeling overwhelming.
I have learned over the years that quality really matters with frames, backing,
and hardware, because that is what keeps your display safe and looking good over
time. Lightweight but sturdy backing reduces the risk of frames warping, and
proper hanging hardware that matches your wall type keeps things from crashing
down, especially in homes with active children. I check that the glass or
acrylic front sits firmly in the frame, with no rattling, and I prefer hardware
that can hold more weight than I think I will need. Investing a little bit more
in well-made frames and hooks is cheaper than replacing broken glass or damaged
photos later. A secure gallery wall also gives me peace of mind when the kids
are running through the hallway or tossing pillows in the living room.
To keep the wall from feeling too busy or too plain, I like to mix a few special
statement frames with simpler ones that quietly support them. A carved wood
frame, a subtle gold metal frame, or a frame with a unique texture can act like
jewelry for the wall, catching the light and drawing attention to a favorite
photo. Around those, I use basic frames in similar tones so the eye has a place
to rest and does not get overwhelmed by constant pattern or shine. This balance
keeps the focus on the images themselves instead of turning the wall into a
frame showroom. When done well, the viewer notices the beauty of the whole
arrangement first and only later realizes how many thoughtful frame choices are
at work.
Incorporating Keepsakes and 3D Objects
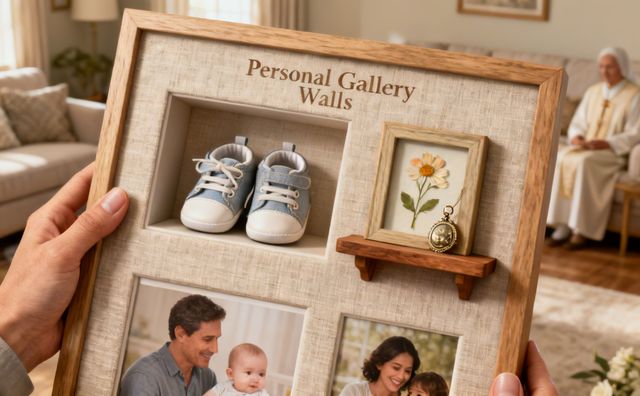
I like to add shelves or shadow boxes when I want to include three-dimensional
keepsakes such as baby shoes, medals, tiny Bibles, or small heirlooms that carry
our family history. A narrow picture ledge or floating shelf can hold framed
photos along with a special object, like the jar of sand from a meaningful beach
trip or a little wooden cross from a mission project. Shadow boxes are perfect
for things that need a bit of depth, because they protect the item while still
keeping it visible and central to the story. These pieces turn the wall into
more than just a display of paper; they remind us of the physical objects we
have held and used in different seasons of life. For me, seeing my son’s first
pair of worn baby shoes or my daughter’s recital ribbon brings back memories in
a way that photos alone cannot.
When I bring 3D items into a gallery wall, I am careful to balance them with
flat frames so the whole display stays readable and not too cluttered. I usually
limit myself to a few key objects and then surround them with photos or prints
that echo their colors or themes. If there are too many shelves and boxes, the
wall can start to feel like a crowded cabinet instead of a clean, thoughtful
arrangement. By treating each 3D item almost like a small piece of sculpture and
giving it some empty space around it, I keep the wall from looking messy. That
balance between depth and flatness brings interest without making it hard for
the eye to know where to land.
Because many keepsakes are delicate or one of a kind, I prefer to protect them
inside glass-front boxes or shallow frames whenever possible. For example, an
old handwritten recipe card from my grandmother sits behind glass so little
fingers cannot smudge the ink, but we can still enjoy seeing it daily. A
military medal, a baptism program, or a dried flower can all be mounted on
acid-free backing and placed in a shadow box for long-term safety. This kind of
protection shields the items from dust, curious pets, and accidental bumps while
keeping them in the heart of our home instead of hidden in a drawer. It feels
good to honor our heritage by treating these tokens with care and respect.
For lightweight textile pieces such as a lace handkerchief, a ribbon, or a tiny
baby hat, I sometimes use small hooks or pins to attach them inside a frame or
directly on a board within a shadow box. I am gentle and use pins in places that
will not cause too much damage, like seams or edges, especially if the item is
old. These soft pieces add a lovely sense of texture and history, breaking up
all the hard edges of frames. A little bit of fabric can make the whole wall
feel more tender and personal, especially if it once belonged to a grandparent
or was used at a special event like a wedding. It becomes a quiet reminder that
real people, not just faces in pictures, lived these stories.
With three kids in the house, I have learned to be smart about where I place
sentimental items so that children can see them but not easily grab or damage
them. I keep the most fragile pieces higher on the wall or inside sturdy shadow
boxes, and I put sturdier frames at a lower level where small hands are more
likely to touch. This way the kids still feel included and can point to their
own photos or art without me constantly worrying about something breaking. I
also talk with them about why certain items are important, which helps them
learn to respect family history. It is a balance between protecting treasures
and allowing children to be present and curious in their own home.
When I include heirlooms on a gallery wall, I like to document their story by
writing a small note or card with the date, the person it belonged to, and any
meaningful details, then I tuck it behind the piece or attach it to the back.
This way, years from now, my children will not have to guess whose handkerchief
it was or what event that old ticket came from. These quiet notes become a
written record that travels with the object, turning it into a piece of family
history instead of just an old thing on the wall. If I ever pass items down to
my kids or grandkids, they will have that context and can choose to keep the
story going. It is a simple habit with a big impact on preserving our heritage.
Styling by Room: Living Room, Hallway, Bedroom, and Nursery
In the living room, I like to make the gallery wall a true focal point above a
sofa or console table, using larger anchor pieces to ground the arrangement.
This is often the room where we host guests and spend time together as a family,
so I choose images that feel welcoming and joyful, like a big family portrait or
a beautiful landscape from a favorite trip. I build out from that anchor with
medium and small frames, keeping the overall shape roughly rectangular so it
feels calm and intentional behind the furniture. Including a framed Bible verse
or a meaningful quote can quietly point to our values without being pushy. When
the living room wall is done well, it draws people in and makes them feel like
they are stepping into a real home, not just a styled space.
In a hallway, I often use a more linear, timeline approach, with evenly spaced
frames that are easy to view as you walk by. This space is perfect for telling
the story of your family from early days to the present, starting with wedding
or baby pictures near one end and progressing through birthdays, school photos,
and big milestones. Because hallways are narrow, I usually keep frames fairly
flat and consistent in depth, skipping bulky shelves that could get bumped. The
even spacing and straight line help the wall feel tidy and simple, even if there
are many images. Walking down that hallway becomes a little journey through your
history, and my kids love to see how they have grown from one frame to the next.
For the master bedroom, I prefer to keep the gallery wall more intimate and
calm, since this is a place for rest and connection with my husband. I choose
soothing colors, softer lighting, and fewer high-impact images, focusing instead
on tender moments like a close-up of our hands, a quiet landscape, or a favorite
wedding photo. I avoid overly busy layouts or bright, loud colors that might
steal the sense of peace we want in that room. Sometimes I add a simple
Scripture verse about love or trust above the headboard to remind us of the
foundation of our marriage. This more gentle, personal gallery feels like a
private collection just for us, instead of a display meant for visitors.
In a nursery, I like to build a sweet, playful gallery wall that can grow with
the child, using soft colors and cheerful art. I might mix baby photos, simple
animal prints, and a few encouraging words or Bible verses that speak identity
and blessing over the little one. Safety is my top priority in this room, so I
keep fragile items and heavy frames away from the crib or changing table and out
of reach of curious hands as the baby grows. Light frames, fabric wall hangings,
or decals can still create a meaningful display without putting anything risky
over a sleeping child. The goal is to surround the baby with beauty and truth in
a gentle way, while keeping the room peaceful and safe.
Installation, Care, and Updating Over Time
To keep everything secure, I always use proper hanging hardware and a level, and
I often suggest picture hanging strips for renters or for anyone nervous about
putting holes in the wall. Different walls, like drywall, plaster, or brick,
need different anchors, so I check the weight limits and choose hardware that is
strong enough for each frame. A small level or even a level app on your phone
helps you make sure frames are straight, which makes a huge difference in how
polished the wall looks. For lighter frames, picture strips can work very well
and come off cleanly when it is time to move or change the display. Taking a
little extra care with hanging tools up front saves time and frustration later.
Once the wall is up, I make a habit of dusting the frames regularly and keeping
them out of direct sunlight as much as possible to protect the photos and
colors. Dust can build up faster than we think, especially on the top edges of
frames and shelves, so I use a soft cloth or duster during my normal cleaning
routine. If sunlight hits a certain wall strongly, I either use UV-protective
glass or choose less fragile prints for that spot. I also avoid harsh cleaners
on the glass and stick to a gentle wipe to prevent streaks or damage. These
small acts of care help the gallery stay fresh and bright for years instead of
fading or looking neglected.
I like to think of my gallery walls as living displays rather than fixed
monuments, so I refresh them seasonally or after major life events. In the fall
or at Christmas, I may swap a few pieces for seasonal art or family holiday
photos, which makes the home feel in tune with the time of year without changing
all the decor. When we have a big milestone like a graduation, a new baby, or an
important anniversary, I print new photos and rotate them into the wall,
sometimes moving older images to a different part of the house. This gentle
updating keeps the wall lively and honest, showing where we are now as well as
where we have been. It also reminds me to keep capturing our life with
intention, knowing that those images will eventually find a home on our walls
and in our family story.